Tuesday, January 31, 2006

New Icon

Here's my new icon I whipped out.

It's the Don Post Metaluna Mutant mask from '66 jazzed and gif'd up in Photoshop.
The kid shootin' the finger was getting old.

Monday, January 30, 2006

Derek Art


You must now go check out DEREK ART for the hippest lines, dad!


Thanks to Mr. BaliHai

Saturday, January 28, 2006

Turbine Project part II


After the turbine engine was assembled, came the suspension system for
the front and back. The actual Turbine had a special front suspension design so the
whole engine and transmission can be removed all at once for service.
The model's wheels and axles have a special assembly designed to make the tires turn freely and still be connected to the steering spindles firmly.
The front "K" frame had to be
joined, top to bottom, with some play to allow the spindles to move freely, and have
the springs positioned.
The original kit had styrene springs for the front suspension.I've seen coil springs for models, but this is crazy...it's an actual working spring. Since the kit had only one (the other might have been digested by a dog), I decided to use actual scale springs that matched.
After placing the spindles and springs between the top frame and bottom, I glued it at strategic places and held it with a clothes pin until dry. Here you can actually see the coil spring in place and looking like an actual suspension system.
The rear suspension was simple...just an axle glued to two springs. The tricky part was to glue the "retaining pins" through the backing plate of each wheel and into the spindle shafts on the brakes...trying not to get any glue on the backing plate. This was done old school, by applying the Testors styrene glue inside the spindles with a toothpick. With the "retaining pins" glued in place, and not the backing plates, this allows the wheel to spin but keep the brake drum stationary. Make sense? No? Here's a diagram from the instructions:
It even suggests a drop of oil between the brake discs and the wheel plates!! Actual oil in a model car! That's detail!
The same "gimmick" had to be done on the front wheels, except they had to fit on the steering spindles. After that was done, I attached the tie rods to link the two spindles and glued on the tires.

If you noticed everything has been painted flat black, then glued together. When gluing styrene, the paint isn't a barrier. The glue melts the paint right along with the plastic, then they both dry and bond. Trying that with super glue would not work. Super glue will melt the paint, but never cure, leaving you with a sticky mess. FYI.

Next time...the interior.

Thursday, January 26, 2006

Barry Blog

Barry's just started his blog and it sounds promising...POPCEREAL.
So now that I've already posted about it...the pressure is on. Hit it, dad!

Tuesday, January 24, 2006

Creature from the Blog Lagoon

I won this Aurora Creature from the Black Lagoon kit on Ebay and whipped it out real quick between other projects. It didn't have a base, so the guy gave it to me cheap. I don't particularly like the Aurora base any way. It was the metal flake green plastic, so I assumed it was a recent run.
I started by checking and reglueing some seams...then the putty came out. I use Magic Sculp for most of my modeling. I use it for prototypes too.
One of his finger nails was gone, so I had to reconstruct that out of putty as well.
I've always wanted to resculpt the face, as I thought that it was ok...but not real close.
I changed up the brow...which was shallow...and built out the cheeck bones & filled out the cranium and gills.
The upper lip needed to be filled out, his chin strengthend, and the teeth filed down as well. (Teeth?)
After all the puttied seams and everything were set, I hit it with a black primer...
then an airbrushed moss green base coat...
then dry brushed a slightly lighter shade for the highlights.

For the shadows, I ran a thin wash of flat black under the edges and folds. A water color type wash will dry light and have a faded effect. I accented the gills and fins with a brick red for contrast.
According to Ben Chapman, who wore the suit on land, the creature suit was a sea, or moss green and fairly simple in color. The red lips that are shown in paintings and images from the movie were done for publicity reasons.
The base is just a wooden plaque, built up with "paper clay" and painted with acrylics. The wet look an the ground is the same product by Krylon that I used on Super Fuzz...Krylon Triple Thick Gloss. To make his skin look moist, I spattered it lightly with a gloss spray, leaving some areas flat. Ok....back to cars.

Saturday, January 21, 2006

Spacesick


I'm not sure what happned to Detroitsuperfly....but I replaced that link with the new and jaunty "Spacesick" blog. Check him out...he draws, so he's probably ok.

Thursday, January 19, 2006

Menooshea History

This blog actually started out as a zine a year ago. I wanted to do an old school cut n paste xeroxed zine called Minutia and sell it for a buck at the more esoteric book stores. Y'know...go all 90's and zine crazy with the whole Art Chantry clip art thing. Then, I saw Dave's blog and thought..."Hey, I don't have to spend any dough on printing and a lot more people will see the posts/articles." It's a little more free style...all you do is type, attach and post...AND it's in color!
Here's the covers for issue #1.


I'm going to write the same articles here that I planned for the zine, so it'll be like the printed version.

...you just can't read it on the john.

Monday, January 16, 2006

Spiderman...Nobody Knows Who You Are!

I was real excited to hear the The Electric Company was coming out on DVD finally, (eventhough it's a "best of" compilation and not season 1) 'cause I'm a huge fan. I'll probably get it at Deep Discount DVD they seem to have the best prices most of the time...or they do in this case, at least.
I've got a pretty big collection of Electric Company items, including: the Spidey Stories album, several of the story 45's, magazines...even a teacher's edition of the school activity book. I'll scan some stuff at some point and post it.
I had TEC on my mind the other day when I popped into a local comic store I'd spotted a while back. They had a good selection. One of the boxes had a healthy run of The Electric Company's Spidey Super Stories, including #1.
I'm sure whoever collected them, wanted them for the Romita art and could care less about TEC as the stories are very basic and non violent. I plan to go back and get some other issues, but I bought #1 and have scanned it for your bemusement. I also scanned the very short story that shows how Spidey came to be a cast memeber of The Electric Company. Included in the story is, of course my favorite, Easy Reader...Morgan Freeman.

Friday, January 06, 2006

Django


Last year Blue Underground released another version of Sergio Carbucci's '66 spagehtti western, DJANGO. The first DVD release was from Anchor Bay, who released it with DJANGO STRIKES AGAIN. I bought a copy of this, but for some reason, Django Strikes Again wouldn't play in my player. My player plays everything so, disapointed, I took it back and never bought another copy.
Blue Underground's release has inteveiws with Franco Nero and assistant director Ruggero Deodato and also included for the first time is the optional Italian audio track featuring Franco Nero’s own voice. The transfer is from the original negative and, to date, this is the best transfer.

If you've not seen this film, go rent it, at least. It's a very richly textured spaghetti western with great graphic images. A lot of spaghetti westerns were slim on actual story, but made it up with juicy situations, style, and gun play...Django delivers these.
The opening scenes have Django walking across the muddy terrain dragging a coffin behind him...an absolute brilliant graphic image and metaphor. These westerns are also known for their great theme songs and soundtracks. Django has one the most memoriable opening theme songs since The Good, the Bad, and the Ugly. You'll not be able to shake it out of your head...guaranteed!

Other great westerns by Carbucci...COMPENAROS!" Highly recommended!

DVD Easter Eggs:
On the "Extras" menu screen, highlight "Django - the one and only" and press your Left button. "DJANGO" will appear on the coffin. Press your Enter button and trailers for Django, Kill!, Run, Man, Run, and A Man Called Blade play.


Wednesday, January 04, 2006

The "Turbine Project"


My buddy Eric gave me this Jo-Han '63 Chrysler Turbine model a couple of years ago for my birthday. I have to put it together now. It'd be wrong not to make it. He had this for a few years,...since '89, I think, and he knew he couldn't do it, (it over whelmed him) so he gave it to me.
I'll be putting it together over the next few months..a little here...a little there, and I'll document it for the model or car fans. I'll try to show every detail and process. I'm sure I'll put other quicker models together in between here..and there...but this one is a long range project.
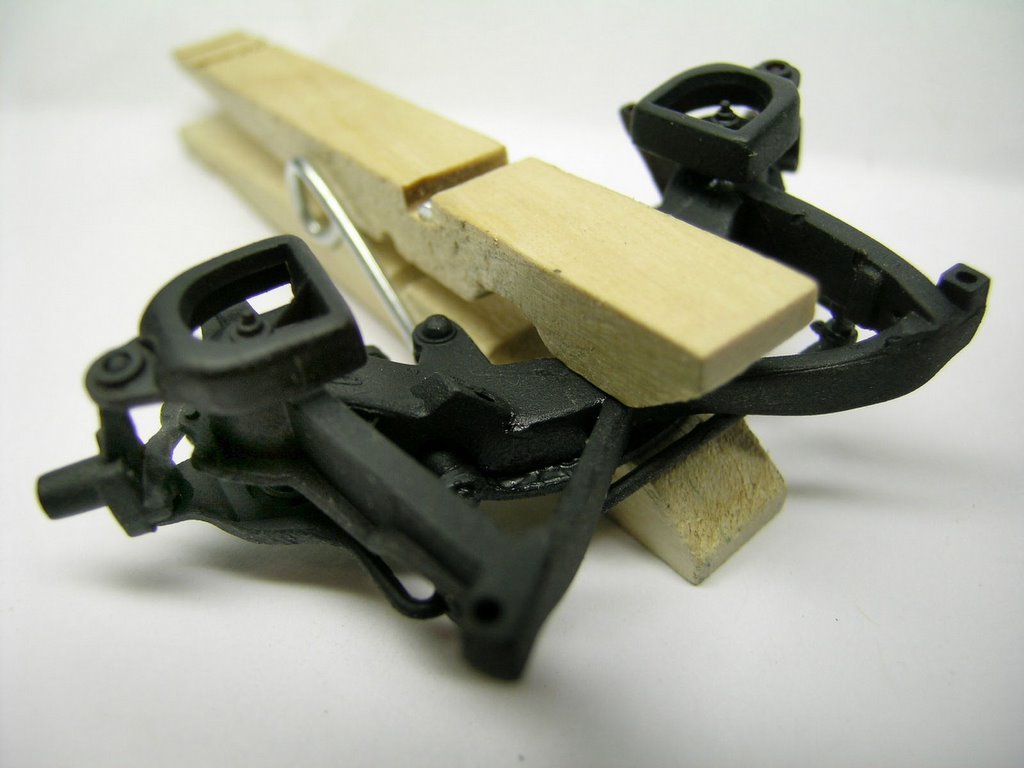
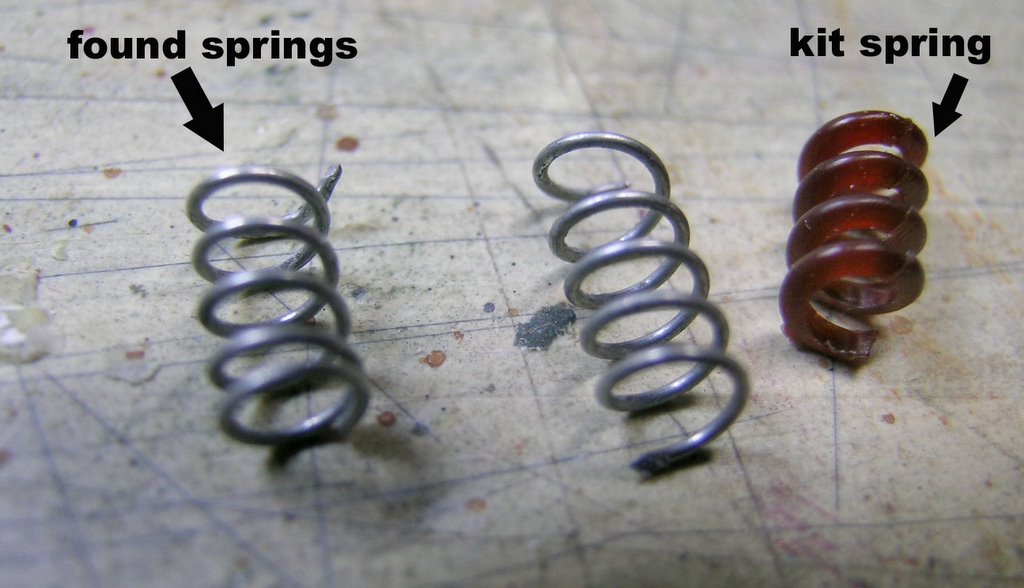
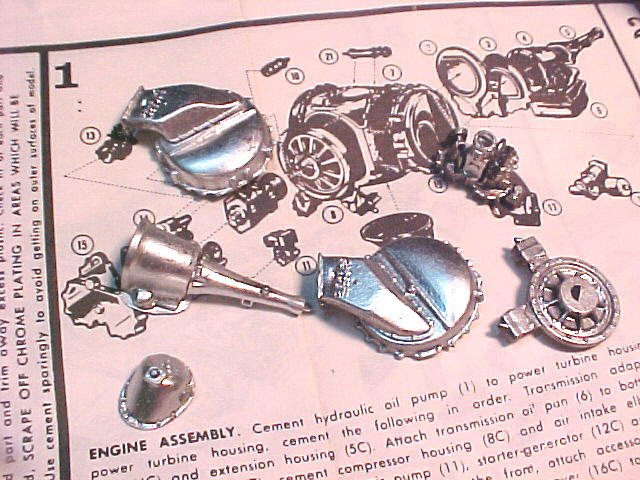
Jo-Han models are incredibly detailed. The seats alone can fold down and are made up of 5 pieces each seat!! The doors open, as does the hood and trunk. The steering works and..get this..the suspension is supposed to work with real tiny styrene springs!! This is the most detail kit I've ever worked on...and over the many years of building kits (since the 3rd grade) I've built hundreds...literally.
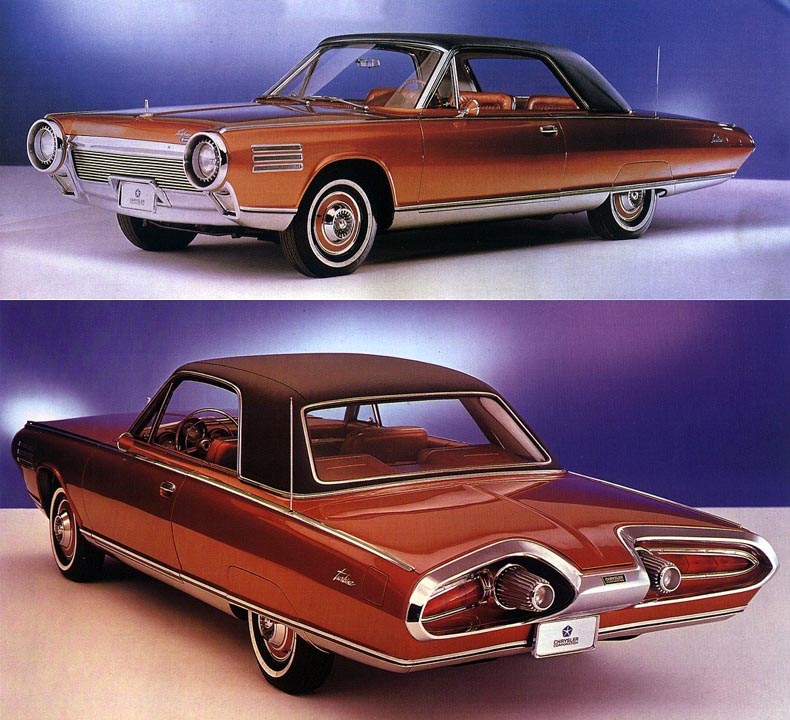
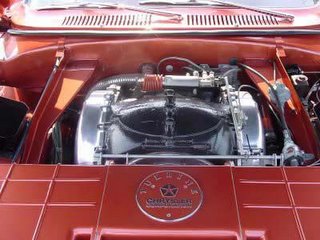
Here's some pics of a real Chrysler Turbine...


Pretty cool.

The engine is not a standard engine...it's a gas turbine engine. Using a high speed air intake, one spark plug, and fuel injection, the engine super heats the air and fuel, driving the turbines
even faster. That's transmitted to the transmission, then to the rear wheels.
That's a simple explanation.

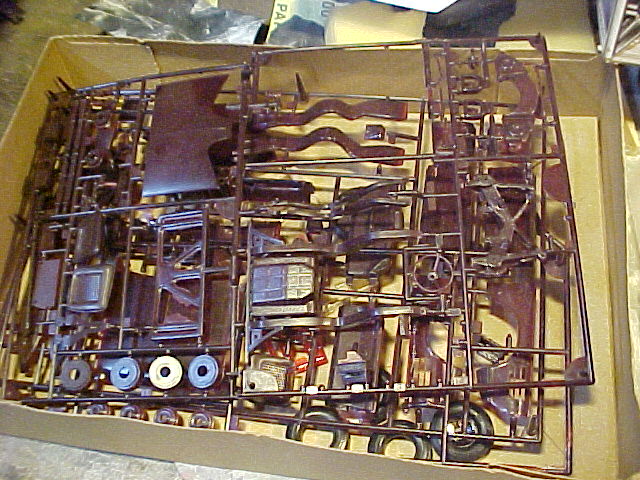
When I got the kit, Eric said his puppy (a few years ago) chewed into the box. After opening it and looking at the contents,
I found out that the little fart chewed part of the rear right door interior panel...and a thin plating on the main turbine housing. Everything else seemed ok.
I started with the engine, as you usually do with car models. I took careful note of the damage, compared it to a real engine (see pic), then went to repairing it.


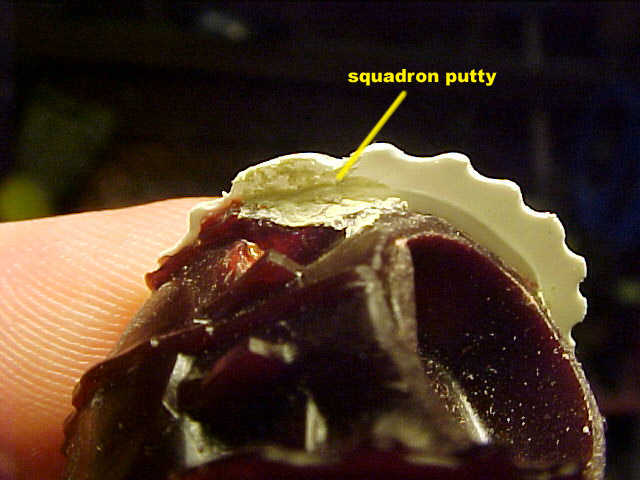
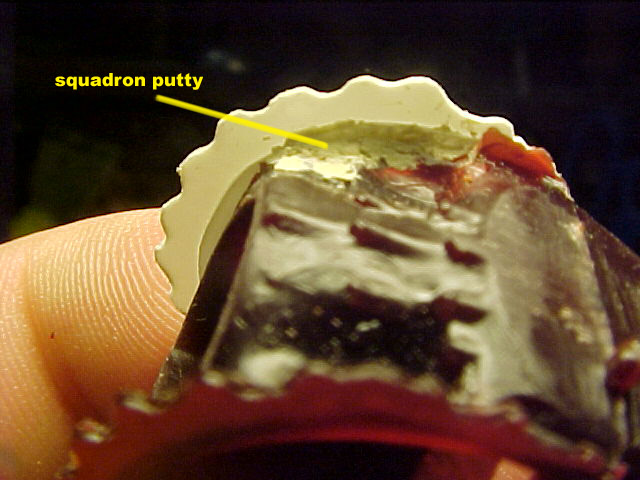
I traced the other housing plating onto a a sheet of styrene & cut it out with manicure scissors. I then added a secondary sheet to match the thickness of the other side, then sanded the exact gaps and points with a pin file.

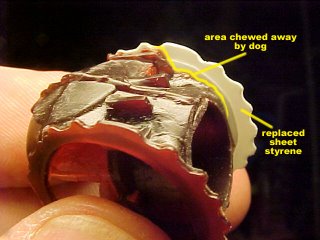
I glued the plates to the side of the housing and filled any gaps with squadron putty.


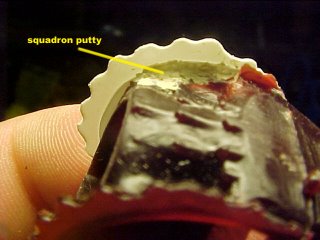
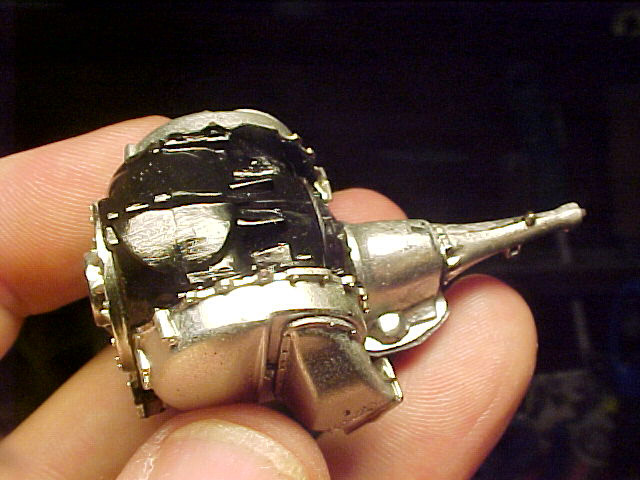
I sanded and fine tuned all irregularities, primed it with flat black..then a gloss.
The kit came with a lot of chrome parts for the engine, and since I don't think that models should have that glossy looking chrome on the engines...and after checking my reference pics again...I hit the chrome parts with Testors dull coat to bring it down to a machined aluminum look.

I glued the chrome parts (burner cover, exhaust convergers, transmission case, etc.) to the main housing with Testors Styrene glue...the watery stuff.


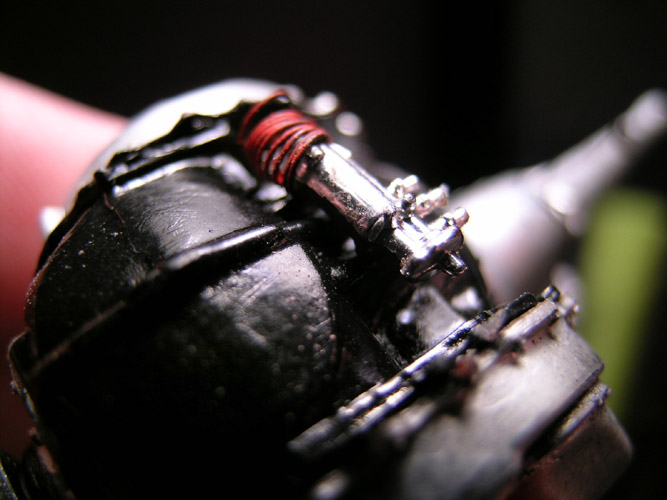
I noticed on real cars, the nozzle actuator...the chrome thing on top...had a red coil cover that wasn't made for the kit. So I made one with coiled wire and will connect it to the proper point once I drop it in the car
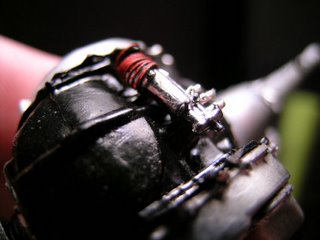
. There are some other actuator rods and stuff that I'll fabricate, but for now...this is good.
Dell Coupon
Free Hit Counters