
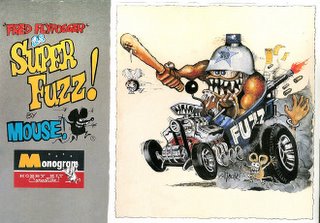
Super Fuzz!
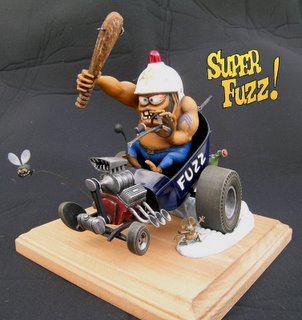
I'm not trying to make this blog about models, but they seem to have popped up in importance recently and I have picked up the glue again. I guess fixin' up that Deal's Wheels "Van" put a kick start back in my fascination with the hobby. I didn't really have, or could afford, the time to work on models the past couple of years. I can't stand to let things sit on a shelf for long, that's why I put this Fred Flypogger kit together finally...
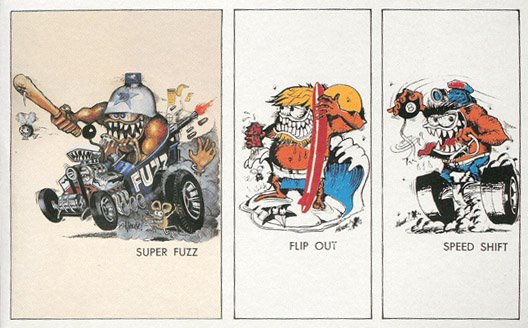
Designed by Stanley Mouse (Miller) back in '64, this was another kit that rode the wave of hot rod monster kits in the early 60's. Ed "Big Daddy" Roth and Mouse were contemporaries, so they shared ideas and while Roth was working for Revell on Rat Fink stuff, Mouse was working at Monogram on Fred Flypogger stuff.
The three kits at Monogram were, Flip Out, Speed Shift, and Super Fuzz.
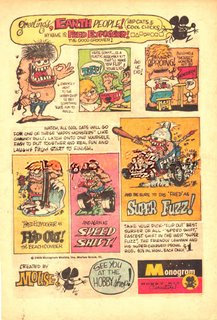
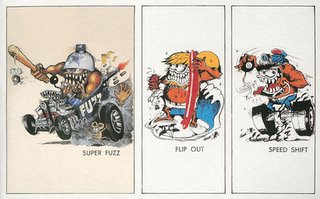
These haven't been available since '64, from what I can tell, and only a couple of years ago did Monogram crack open the vault and re release Super Fuzz. You could'a found them on Ebay as resin recasts, but even at that, they'd be $50-$75!! Even this reissue is hard to find!
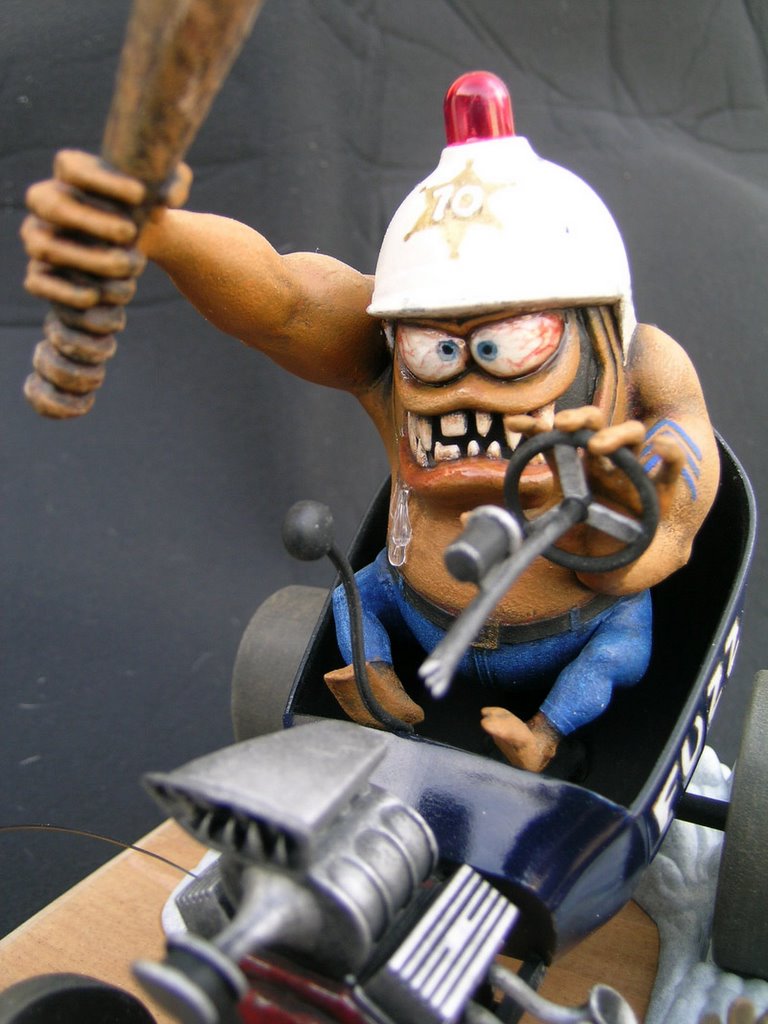
I put this one together in about a few days, spread out over a few weeks. I based the color schemes on Mouse's original art from the box...
 (click pics for super detail)
The whole thing was glued together with Testors' styrene cement...the clear watery type. This type of cement is perfect for detail. You join the pieces, brush a drop onto the seams, and let the watery cement run the length of the seam via capillary action. Makes for a great bond.
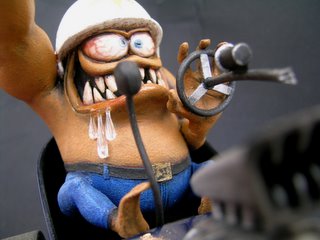
You had two ways to seat him...way down in the seat...or up high to show his feet and officer uniform.
I primed it with cheap flat black primer, wet sanded the car body, then painted the blue color with a floral paint called Design Master.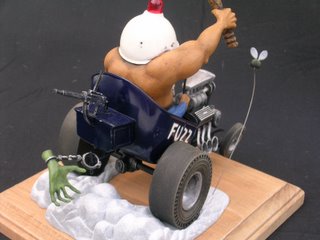
These paints are acetone/acrylic based and are great for styrene kits. They come in all kinds of shades. I used them on the "Van" as well. I see a lot of people moving toward the acrylic based paints now. I can't seem to get the "rattle can" hobby car paints to smooth out as much as I want. I wet sanded the final coat, ran a tack rag over it, then sprayed a couple of layers of a clear gloss called Acrylic Clear Coat (Gloss) by Plaid.
Everything else besides the car body, was finished with ordinary acrylic craft paint in a dry brush technique. If I wanted deeper shadows, I would run a brownish/black wash in the creases.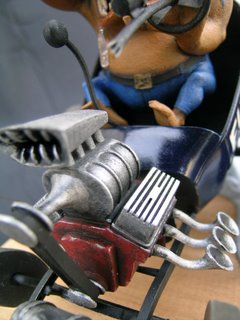
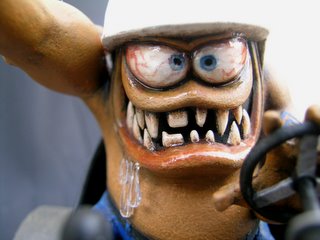
I painted the light on top red instead of blue because there was plenty of blue in the over all scheme, and the red police light was synonymous with the motif as well. The light was a drop of red resin tint mixed with the clear coat and brushed into the dome.
The classic fly that came with the kit, I suspended on a length of music wire and positioned out in front as if Fred's chasing it.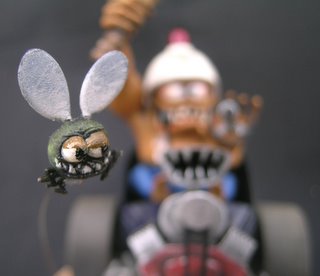
The cuffed hand in back is supposed to be reaching out of the clouds of smoke, but I felt that the smoke was too shallow to allow for a whole person. I made it look as if the hand had been severed a while ago, had gone green, and was flapping in the breeze.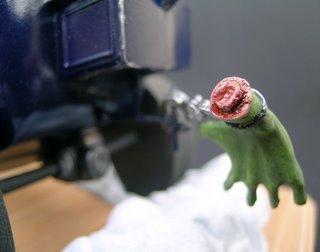
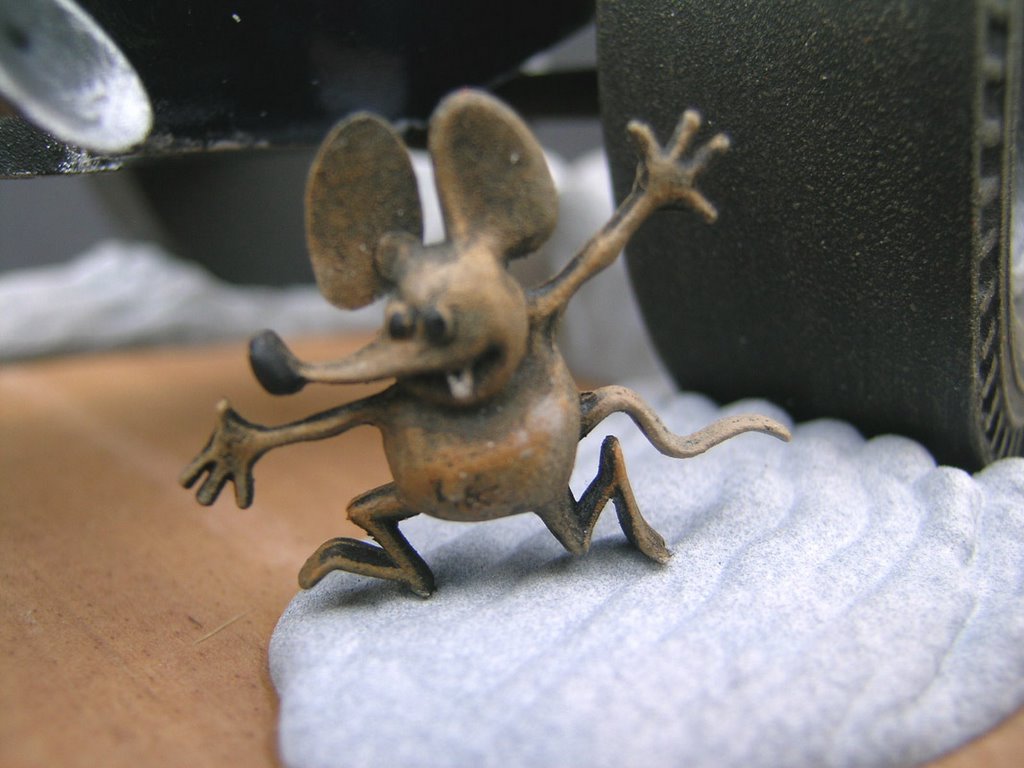
The tires in the kit are molded hollow...no inside shape...just the axle tab and the interior of the front. I glued each tire onto a sheet of styrene, trimmed them out with manicure scissors, and sanded the edges smooth. Looks a lot better I think.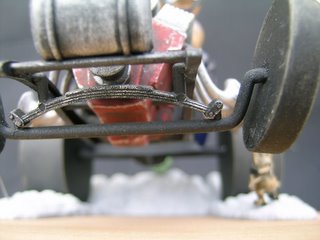
The clear drool came with the kit, but I blended it out onto the lips using Krylon's Triple Thick Crystal Clear Glaze. It's like the heavy thick spray, but it comes in a bottle so you can just mop it on. Perfect for eyes and teeth, etc.
I mounted the whole kit on a piece of 7" X 7" wood plaque with 5 minute epoxy.

By the way, all these pics were taken with my new Nikon Coolpix 5400 Penny got me for Christmas...no more grainy tiny Mavica images! The images are at 300 dpi. I reduce them for bloggin' to 200 dpi. This thing takes insane detail. Each pic was orginally 5 meg!
The next kit is another car model a friend (Eric) gave me for my birthday about 2 years ago, and I'm finally getting my research material together to finish it...
Jo-Han's Chrysler Turbine car...
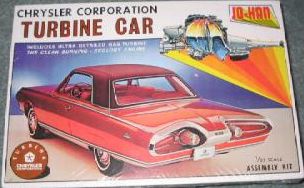
Over the next few months, I plan to put the kit together and take pics as I go, documenting the steps. See next post for the starters...
Designed by Stanley Mouse (Miller) back in '64, this was another kit that rode the wave of hot rod monster kits in the early 60's. Ed "Big Daddy" Roth and Mouse were contemporaries, so they shared ideas and while Roth was working for Revell on Rat Fink stuff, Mouse was working at Monogram on Fred Flypogger stuff.
The three kits at Monogram were, Flip Out, Speed Shift, and Super Fuzz.

These haven't been available since '64, from what I can tell, and only a couple of years ago did Monogram crack open the vault and re release Super Fuzz. You could'a found them on Ebay as resin recasts, but even at that, they'd be $50-$75!! Even this reissue is hard to find!
I put this one together in about a few days, spread out over a few weeks. I based the color schemes on Mouse's original art from the box...

 (click pics for super detail)
The whole thing was glued together with Testors' styrene cement...the clear watery type. This type of cement is perfect for detail. You join the pieces, brush a drop onto the seams, and let the watery cement run the length of the seam via capillary action. Makes for a great bond.
You had two ways to seat him...way down in the seat...or up high to show his feet and officer uniform.
I primed it with cheap flat black primer, wet sanded the car body, then painted the blue color with a floral paint called Design Master.

These paints are acetone/acrylic based and are great for styrene kits. They come in all kinds of shades. I used them on the "Van" as well. I see a lot of people moving toward the acrylic based paints now. I can't seem to get the "rattle can" hobby car paints to smooth out as much as I want. I wet sanded the final coat, ran a tack rag over it, then sprayed a couple of layers of a clear gloss called Acrylic Clear Coat (Gloss) by Plaid.
Everything else besides the car body, was finished with ordinary acrylic craft paint in a dry brush technique. If I wanted deeper shadows, I would run a brownish/black wash in the creases.

I painted the light on top red instead of blue because there was plenty of blue in the over all scheme, and the red police light was synonymous with the motif as well. The light was a drop of red resin tint mixed with the clear coat and brushed into the dome.
The classic fly that came with the kit, I suspended on a length of music wire and positioned out in front as if Fred's chasing it.

The cuffed hand in back is supposed to be reaching out of the clouds of smoke, but I felt that the smoke was too shallow to allow for a whole person. I made it look as if the hand had been severed a while ago, had gone green, and was flapping in the breeze.

The tires in the kit are molded hollow...no inside shape...just the axle tab and the interior of the front. I glued each tire onto a sheet of styrene, trimmed them out with manicure scissors, and sanded the edges smooth. Looks a lot better I think.

The clear drool came with the kit, but I blended it out onto the lips using Krylon's Triple Thick Crystal Clear Glaze. It's like the heavy thick spray, but it comes in a bottle so you can just mop it on. Perfect for eyes and teeth, etc.


I mounted the whole kit on a piece of 7" X 7" wood plaque with 5 minute epoxy.
By the way, all these pics were taken with my new Nikon Coolpix 5400 Penny got me for Christmas...no more grainy tiny Mavica images! The images are at 300 dpi. I reduce them for bloggin' to 200 dpi. This thing takes insane detail. Each pic was orginally 5 meg!
The next kit is another car model a friend (Eric) gave me for my birthday about 2 years ago, and I'm finally getting my research material together to finish it...
Jo-Han's Chrysler Turbine car...

Over the next few months, I plan to put the kit together and take pics as I go, documenting the steps. See next post for the starters...
posted by Riley at 1:12 PM
![]()
![]()

3 Comments:
Excellent job there.
Loved this kit when i was kid...i had it...just looking at the pictures sure brought back memories..the drool..everything...would sure like to find one..for some reason..i thought the light on his helmet was blue..
Loved this kit when i was kid...i had it...just looking at the pictures sure brought back memories..the drool..everything...would sure like to find one..for some reason..i thought the light on his helmet was blue..
Post a Comment
<< Home